-->

High Availability with Failover Clusters

Before moving on to the next chapter on my virtualization lab series, I think this might be a good opportunity to review some of the clustering options available today. I will use Windows Server Failover Clustering with Hyper-V because in today's world the trend is to combine Virtualization with High Availability (HA).

There are many ways to implement these solutions and the basic design concepts presented here can be adjusted to other virtualization platforms. Some of them will actually not guarantee a fault-tolerant solution, but most of them can be used in specific scenarios (even if only for demonstration purposes).

Two virtual machines on one physical server


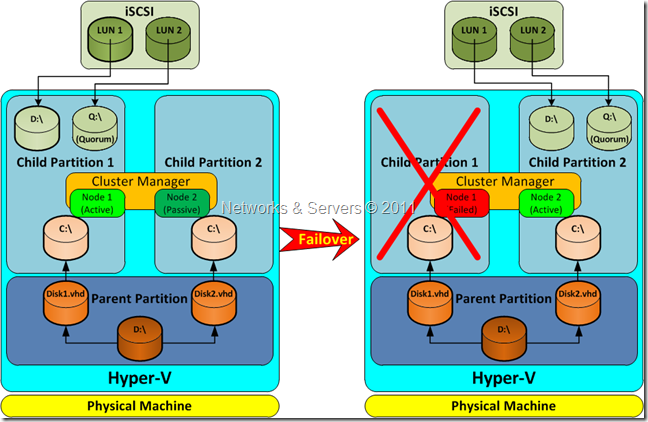
In this scenario an HA cluster is built between two (or more) virtual machines on a single physical machine. Here we have a single physical server running Hyper-V and two child partitions where you run Failover Clustering. This setup does not protect against hardware failures because when the physical server fails, both (virtual) cluster nodes will fail. Therefore, the physical machine itself is a single point of failure (SPOF).
Two virtual machines on one physical server
(Click to enlarge)

How to Setup a Virtualization Lab (III)

Failover Cluster Networking


The first step in the setup of a failover cluster is the creation of an AD domain because all the cluster nodes have to belong to the same domain. But before doing so, I changed the networks settings again in order to adjust them for this purpose.

LAB-DC:IP: 192.168.1.10
Gateway: 192.168.1.1 (Physical Router)
DNS: 127.0.0.1
Alternate DNS: 192.168.1.1

LAB-NODE1:
IP: 192.168.1.11
Gateway: 192.168.1.1
DNS: 192.168.1.10 (DC)
Alternate DNS: 192.168.1.1 (Physical Router)

LAB-NODE2:IP: 192.168.1.12
Gateway: 192.168.1.1
DNS: 192.168.1.10
Alternate DNS: 192.168.1.1

LAB-NODE3:
IP: 192.168.1.13
Gateway: 192.168.1.1
DNS: 192.168.1.10
Alternate DNS: 192.168.1.1

LAB-STORAGE:IP: 192.168.1.14
Gateway: 192.168.1.1
DNS: 192.168.1.10
Alternate DNS: 192.168.1.1

Therefore, I created a domain comprised of 5 machines; a DC and two member servers as Hyper-V VMs, a member server as a VMware VM and another member server as a VirtualBox VM.

So far I have demonstrated the possibility of integrating in the same logical infrastructure virtualized servers running on different platforms using different virtualization techniques; in this case we have VMs running in a Type 1 hypervisor (Hyper-V) and in two distinct Type 2 hypervisors (VMware Workstation and VirtualBox).

The option to create a network with static IP addresses is as valid as the alternative of using DHCP. Later on I plan to explore the several options provided by the cluster networking in Windows 2008 but for the time being I kept my network in a simple and basic configuration in order to proceed with the lab installation.

How to Setup a Virtualization Lab (II)


As mentioned at the end of my previous article, the installation of my lab continued with the creation of virtual machines on the desktop computer. But this time I used VMware and VirtualBox to explore the possibility of using a set of virtualized servers across different and competing virtualization technologies.

I insisted on the network configuration details because that is the basis of all the work ahead; a single virtual machine may be important but I want to show how they can work together and therefore the correct network configuration of paramount importance.

Import a Virtual Machine into VMware


I started by installing a VM on VMware Workstation. Better yet, I took advantage of what was previously done and used the generalized .vhd file I left behind! Since VMware does not directly support the use of .vhd files, I had to convert the file from the format used by Hyper-V (Virtual Hard Disk, i.e., .vhd) to the format used by VMware (Virtual Machine Disk, i.e., .vmdk).

The VMware vCenter Converter Standalone utility is a free application which can be obtained directly from VMware’s official site but doesn’t solve the problem as it doesn’t support this type of conversion, although it can convert from other formats and even directly from servers running Hyper-V. But what interested me was to use the work already done and so I resorted to the WinImage tool.

The process was very simple:

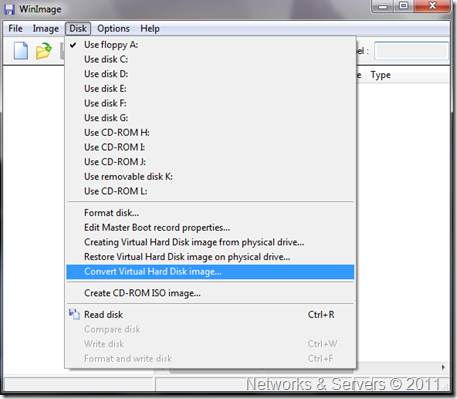
I selected the appropriate option from the Disk menu and select the proper source file;

WinImage